Featured Post

SQL Query in SharePoint

The "FullTextSqlQuery" object's constructor requires an object that has context but don't be fooled. This context will no...

Tuesday, December 10, 2013

Understanding word numbering restarts

In this post I am going to explain what changes in the xml markup when you restart a line number. In the following two pictures you can see how to restart a number and how it effects the numbers in the word document. In the first example I've used non styled numbering.
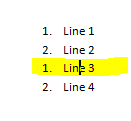


This is what the xml looks like before the restarting. Note the highlighted areas:
And this is what is looks like after restarting line 3. Note that the numId has changed for line 3 & 4.
What has also happened is that a new w:num has been created and along with that a new w:abstractNum.
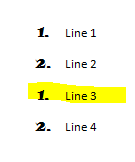
If you use custom styled numbering the behaviour is the same however if you associate a custom styled number to a style and then apply that style to a paragraph the structure is somewhat different. In the below images I have applied this and I restarted the third line much the same as I did in the previous example.
 
This is what the xml looks like before the restarting. Note that there is no numbering associated to the paragraphs, only a style. 
This style is then associated to a number in the styles.xml file. You can see the xml for "Demo Style" in the image below.

This is what the document.xml looks like after restarting line 3. Note that only the third line has a change applied not the forth as well (which is what you saw in the previous example). Even though the paragraph is still associated to the style, a new number id has been associated as well.
Regarding the abstract numbering, in this case a new one was not created. Taking a look at the xml generated in numbering.xml you can see that the new numId "7" points to the same abstractNumId "2" as numId "4" (linked to Demo Style). What's also important is that a w:lvlOverride has been added to the new number as well.


Friday, December 6, 2013

Understanding word numbering manipulation

I've created a document with two types of numbering references. The first references a style which is linked to a number and the second is linked a style but has manual numbering assigned. I've added an image so you can see what this looks like in word. Note that to the front end user it looks like the only difference is the style.

However in the xml there is a slight difference. Here is an section of document.xml showing the xml for the first set of numbering. Note that the first two lines do not have any reference to a w:numId but the second two lines do. This is because the style "DemoStyle" has a reference to w:numId but only the first level. When I indented lines 3 & 4 they needed to be assigned a new numbering level/w:ilvl. Note that these paragraphs are linked to numId "1"
If you take a look at the styles.xml you will see that DemoStyle is also linked to numId "1"
Going onto the manually applied numbering see the xml below. You can see that the numbering has been assigned to all four paragraphs, not just the indented lines.
In the numbering.xml document you will find these numbering items as w:num nodes. These nodes allow multiple items to reference the same abstract number (not shown in this case but is possible).

The w:abstractNumId then references the w:abstractNum. This contains all the numbering information.
To access the numbering part in a document via OpenXml you can use the following code:

byte[] document = File.ReadAllBytes("C:\Demo Doc.docx");
using (MemoryStream memoryStream = new MemoryStream())
{
  memoryStream.Write(document, 0, document.Length);
  using (WordprocessingDocument wordprocessingDocument =     WordprocessingDocument.Open(memoryStream, true))
  {
     NumberingPart numberingPart  = wordprocessingDocument.MainDocumentPart.NumberingPart;
  }
}

Thursday, December 5, 2013

Understanding word style manipulation

To edit your document's styles you can click on the bottom right hand corner of the styles section on the home page.
When manipulating styles the most important thing to note are where styles are referenced. All styles are referenced by id so if you want to change the properties of a style this is quite a simple change and can be done on the specific style node applicable.
So the most obvious place this style could be referenced is inside the document and any headers/footers as you can see in the image below I have a paragraph with the text "Coding Recipes" that is linked to "Demo Style"

There are two other places this style could be referenced. If you look at the style xml is has a "w:basedOn" node pointing to the "Normal" style. It is possible to base a style on any other style so this is another place it could be referenced. The last place is inside the numbering but that is only if your style is linked to a custom number.

By adding a number to my style you can see that the style xml now has some numbering information.
If you used a built in number for your style than you wouldn't have to worry about any other references however if your style was linked to a custom number then a numbering element would get created in numbering.xml and this would have a reference to your style as well as shown in the image below
I'll explain more about numbering in my next post but if you are wondering how the two are referenced you can determine this by finding the w:num element in numbering.xml that has the id "1" (referenced in the w:numid node of the style). You'll then see that numid "1" is linked to abstractNumId "0" which you can see in the image above.


Understanding word headers, footers and section break manipulation

To access a header or footer you can double click at the top or bottom of your word document page.


I'm going to go through some of the areas of the headers/footers. Under the options section there are 2 check boxes "Different First Page" and "Different Odd & Even Pages". So if you check these boxes word will allow the first page to have a different header & footer. The odd and even check box will allow every second page to have a different header/footer. So how does this look in the xml?
In the xml you can see 3 headerReferences and 3 footReferences and they are a child of the "w:sectPr"/section properties node.  A document must contain at least one section property at the bottom of the body and it can contain more depending on whether you add section breaks inside the document. There are 3 types of header/footer references that can be associated with one section property - "even", "default" and "first".

To access the header/footer parts in a document using open xml you can use the following code

byte[] document = File.ReadAllBytes("C:\Demo Doc.docx");
using (MemoryStream memoryStream = new MemoryStream())
{
  memoryStream.Write(document, 0, document.Length);
  using (WordprocessingDocument wordprocessingDocument =     WordprocessingDocument.Open(memoryStream, true))
  {
     foreach (HeaderPart headerPart in wordprocessingDocument.MainDocumentPart.HeaderParts)
     {
         // do something
     }

     foreach (FooterPart footerPart in wordprocessingDocument.MainDocumentPart.FooterParts)
     {
        // do something
     }
  }
}

Another way to have different headers/footers on a page is to insert a section break in your document. To do this go to Page Layout -> Breaks -> Next Page.

Go into the header/footer and then unselect the "Link to Previous" option. Then modify the header/footer.

Something important to note about section breaks if you are planning on modifying them programmatically is the placement of the section break in document.xml. As I mentioned earlier, the document.xml will always have a section break at the end of the body element. The elements that are applicable to this section are all the ones above it - until the previous section break (if there is one). But all the other section breaks refer to the elements below them - until the next section break.

For example. I've created a new word document and inserted 2 section breaks. On each page I have added text to indicate what page number it is. Look at the xml that got generated to understand further what I am trying to explain:

What is also very important to note here is that the last section property exists as a child of body however the other section properties are nested inside a paragraph object (w:p).

Tuesday, December 3, 2013

Understanding basic office document manipulation

This post for anyone who wants to know on a very base level how office documents work regarding their xml structure.

So the first thing you should know is that all office documents are actually a collection of xml files. The names of the files and folders inside this collection can be different depending on what type of office document you are working with (word, powerpoint, excel, etc). However in this tutorial we are going to be working with a word document.

Opening a very basic word document using a decompression tool (I used WinRAR in this example) you will see the following contents.

the _rels folder contains all the relationship files. These relationships are used to map xml files together.


So if you go into the word folder you will see a few different xml files.

If you go inside the _rels folder you will find a corresponding xml file to document.xml called document.xml.rels.


I added a chart to my document and you can see some new folders have been added. Opening document.xml you will see the following xml structure.

The main node is "document" and directly underneath this you can find the "body". This is the standard structure for this file. The body will mainly contain paragraphs (w:p) however there will be a few other nodes as you can see at the bottom there is a "w:sectPr" node. This is a section property node which contains information about the page (size, margin, columns, header, footer, etc). This node will always be found at the bottom of the body node. If you insert a section break inside your document then you will find other nodes like this inside the body node.

In this example I have inserted a chart. What this has done is inserted a w:drawing element which contains information about the chart. The data for the actual chart image however is stored elsewhere. To reference this data there is a r:id node on the c:chart element with a value of "rId5". If I then open the document.xml.rels file I can then see this id then points to the file charts/chart1.xml
So when you open this file in word it will deserialize these xml files into COM objects and show the document. If the xml markup does not correspond to the objects then you will get a corruption error in word. For example if I delete the charts folder and try to open the file I will get the following error:
You could also modify the contents of the xml file manually by extracting it from the docx modifing the contents and dragging it back into WinRAR. This is quite handy when you are trying to troubleshoot.

Thursday, January 17, 2013

Document.ReadOnly (Office 2007) does not consider checked in documents

If you have ever worked with word add-ins there will have been a point in time where you would have needed to determine whether a document is read only or not. There is a boolean property on the Document class called ReadOnly.

With the introduction of SharePoint documents can be read-only if they have not been checked out. Word 2010 takes this into account however Word 2007 can out before SharePoint and does not cater for this. If your document is not checked-out (making it read only), the ReadOnly property will return false in Word 2007.

The way we resolved this issue is by creating an method on our webservice which indicates whether a document is checked out or not. This helps us determine whether we can allow the user to edit the document. Remember that forcing check outs on documents in libraries is configurable so remember to check this setting first.


if (!spListItem.ForeCheckout)
{
   return false;
}


if (file.CheckOutType == SPFile.SPCheckOutType.None)
{
   return false;
}

return true;


Wednesday, January 9, 2013

How to copy one PackagePart to another

One of the most used functions in my xml utilities class is the one that copies the contents from one PackagePart to another. It's simple but if you don't know how here's a easy code snippet :)

public static void CopyContents(PackagePart packagePartIn, PackagePart packagePartOut){

  using (Stream outputStream = packagePartOut.GetStream(FileMode.Create, FileAccess.Write))  {

    using (Stream stream = packagePartIn.GetStream())    {

      byte[] contents = new byte[stream.Length];      stream.Read(contents, 0, contents.Length);
      outputStream.Write(contents, 0, contents.Length);
    }
  }
}